Introduction
UV Master is a free plugin for ZBrush 4.0 Windows and Mac OS X, which will generate UV coordinates for your ZBrush models in a single click. When using a 2D map with a 3D model, the model must have UVs, which are 2D coordinates needed for your texture to display accurately on your model. It creates the necessary UV seams, followed by the unwrap and packing of the UVs.
This result is an optimized unwrap which is understandable to the human eye and so it is possible to work on the corresponding texture in a 2D painting software like Photoshop.
You can download the Uvmaster Documentation Ebook on the pixologic web site.
Unwrapping a model
1. Open Your Ztool
2. Draw it on the canvas
3. Go in the Edit Mode (T)
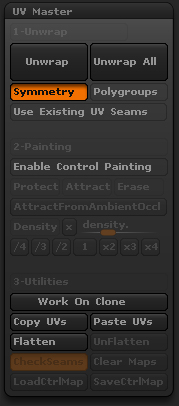
4. Go to the Zplugins Tabs and expand the Uvmaster Menu, or drag the menu in the lateral toolbar.
5. If the model is not at the first level of subdivision, change it to the lower level.
6. Now click on Work on Clone.
This command will created an instance of your model, and the subdivision level disappears ( don’t be afraid your model is safe ;) ).
7. Click on Unwrap
8. At this step the Seams are generated and you can show them by activating CheckSeams
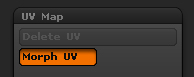
9. Now to show the result you must go in the Ztool Tabs and expand the Uvmap menu
10. Click on Morph UV
11. Ok to get an uvmap that match more with your needs you can enable the paint Tool.
Symmetry : When activated the uvmap will be fully symmetric.
Polygroups : When activated the Uvmap will be cutting by polygroups, it will generated several uv island ( region )
12. When you are done with the Cloned Model, you will have to Copy the UVs onto your working Ztools.
13. So to do it, from the Ztool tab choose your Original Ztool. It will be displayed on the canvas
14. Then Click on Paste Uvs.
15. Now check the Result by morphing the uv map ( Ztools > Uvmaps).
16. We are done !
Uvmaster Polygroups
Ok Here his my favorite method to improve my uvwrapping.
With Uv Master the Uvs seams can be based on the polygroups of your model. You can improve the polygroups of the “Cloned model”
When you are working on “the Cloned model”, you can rebuild the polygroups to fit with your needs. This Operation will not affect the original polygroup on the working model ( not the clone).
Check the Improve the polygroups Tutorial for more details.
My workflow
- Activate the uvmaster plugin
- working on a cloned model
- Creation of the polygroups to fit my needs
- Activate the Polygroup mode and and no Symmetry Mode.
- Unwrap !
- Copy the Uvs
- Switch to the working ztool
- Paste UVs
- If i want to get the polygroups of the cloned model on your working model, go Ztools > Polygroup> Auto Groups with UV.